
Mapping An AWS Route 53 Domain To Your Hashnode Blog
Why Route 53 Is Different

Why Hashnode
Hashnode's biggest selling point for me is that it fully supports my personal domain for free. This means I get to continue to blog under my own name, sandra-suarez.com, while taking advantage of all the features the platform offers, including issuing and renewing an SSL certificate for me. No more renewing my Let's Encrypt SSL certificate every quarter :)
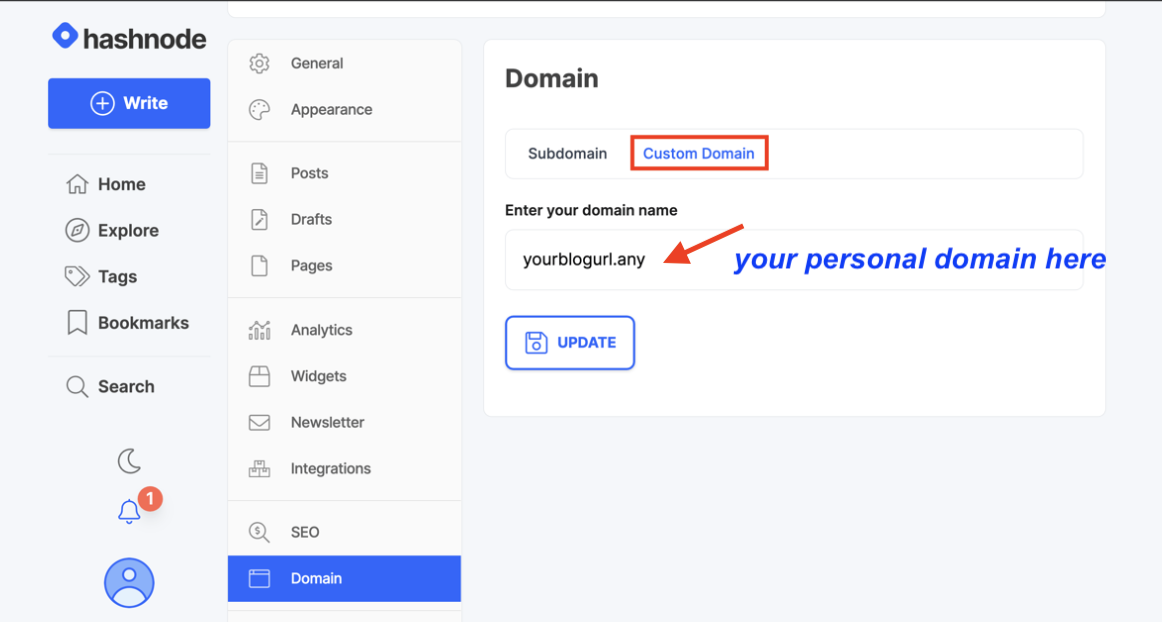
Hashnode's General-Purpose Custom Domain Support
Hashnode provides instructions to map your personal domain to your Hashnode Blog. They even provide detailed guides for GoDaddy, NameCheap and Cloudflare DNS providers. But not for AWS Route 53. At least not as of June 2022. I spent a few hours troubleshooting my setup and I'm sharing my lessons learned.
Why Route 53 Is Different
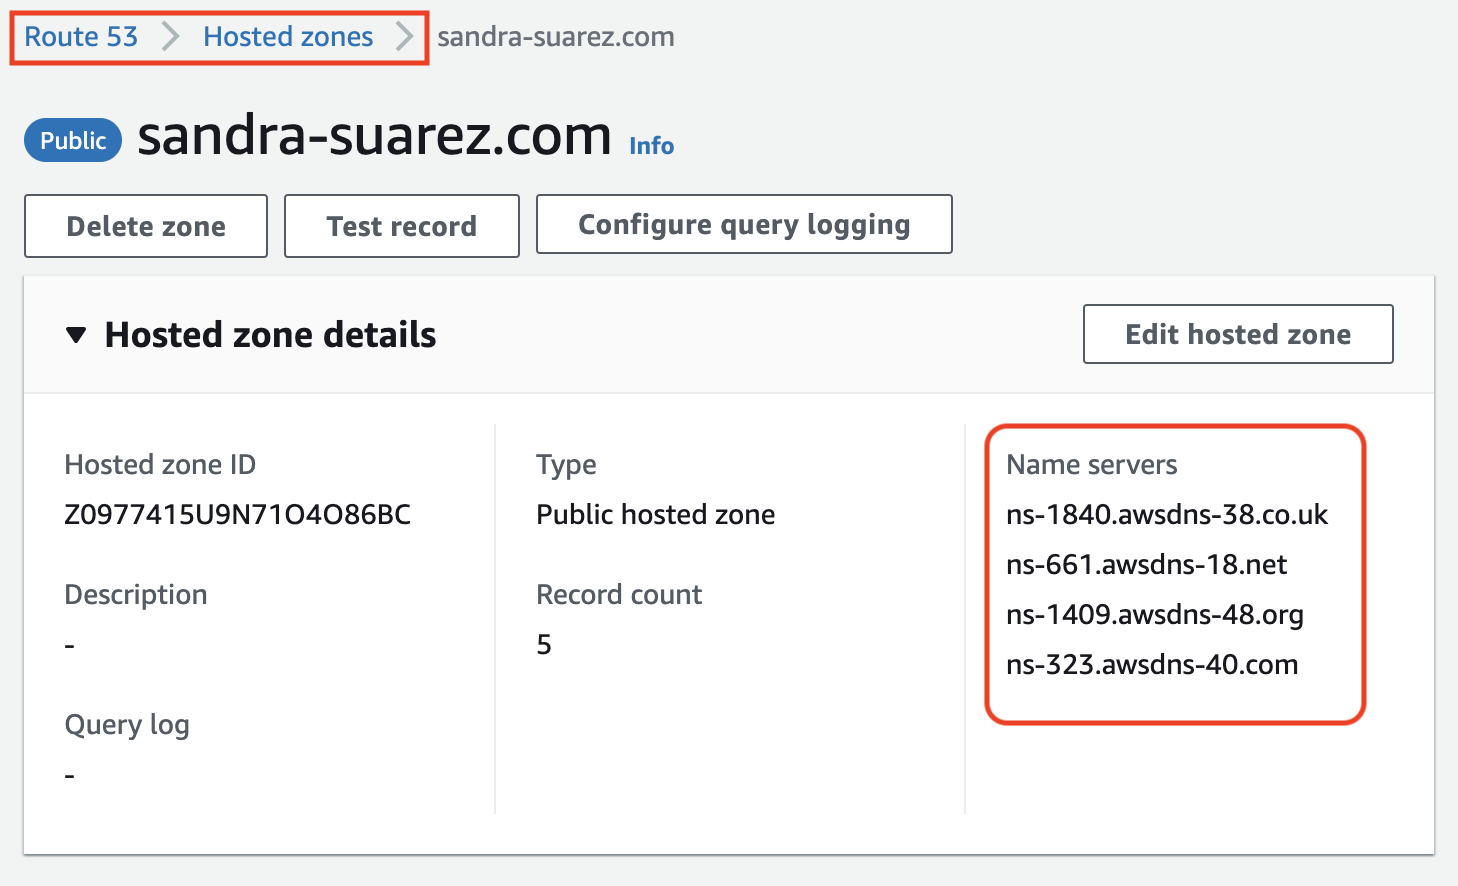
AWS Route 53 requires the additional setup of a hosted zone for your domain, something not required by other DNS providers. And the existence of such a hosted zone introduces the risk that the name servers at the hosted zone level may not match the name servers at the domain level. This was my problem.
1. Verify Name Servers Match
Problem: I had mismatched name servers between my registered domain and my hosted zone.
The Fix: Copy the name servers from the hosted zone over to my registered domain.
a. Make a copy of all domain name servers in your hosted zone.
b. Next, proceed to the registered domain section. Click on the "Add or Edit Name Servers" link under the name servers section and add all servers. You will need to add each one at a time.
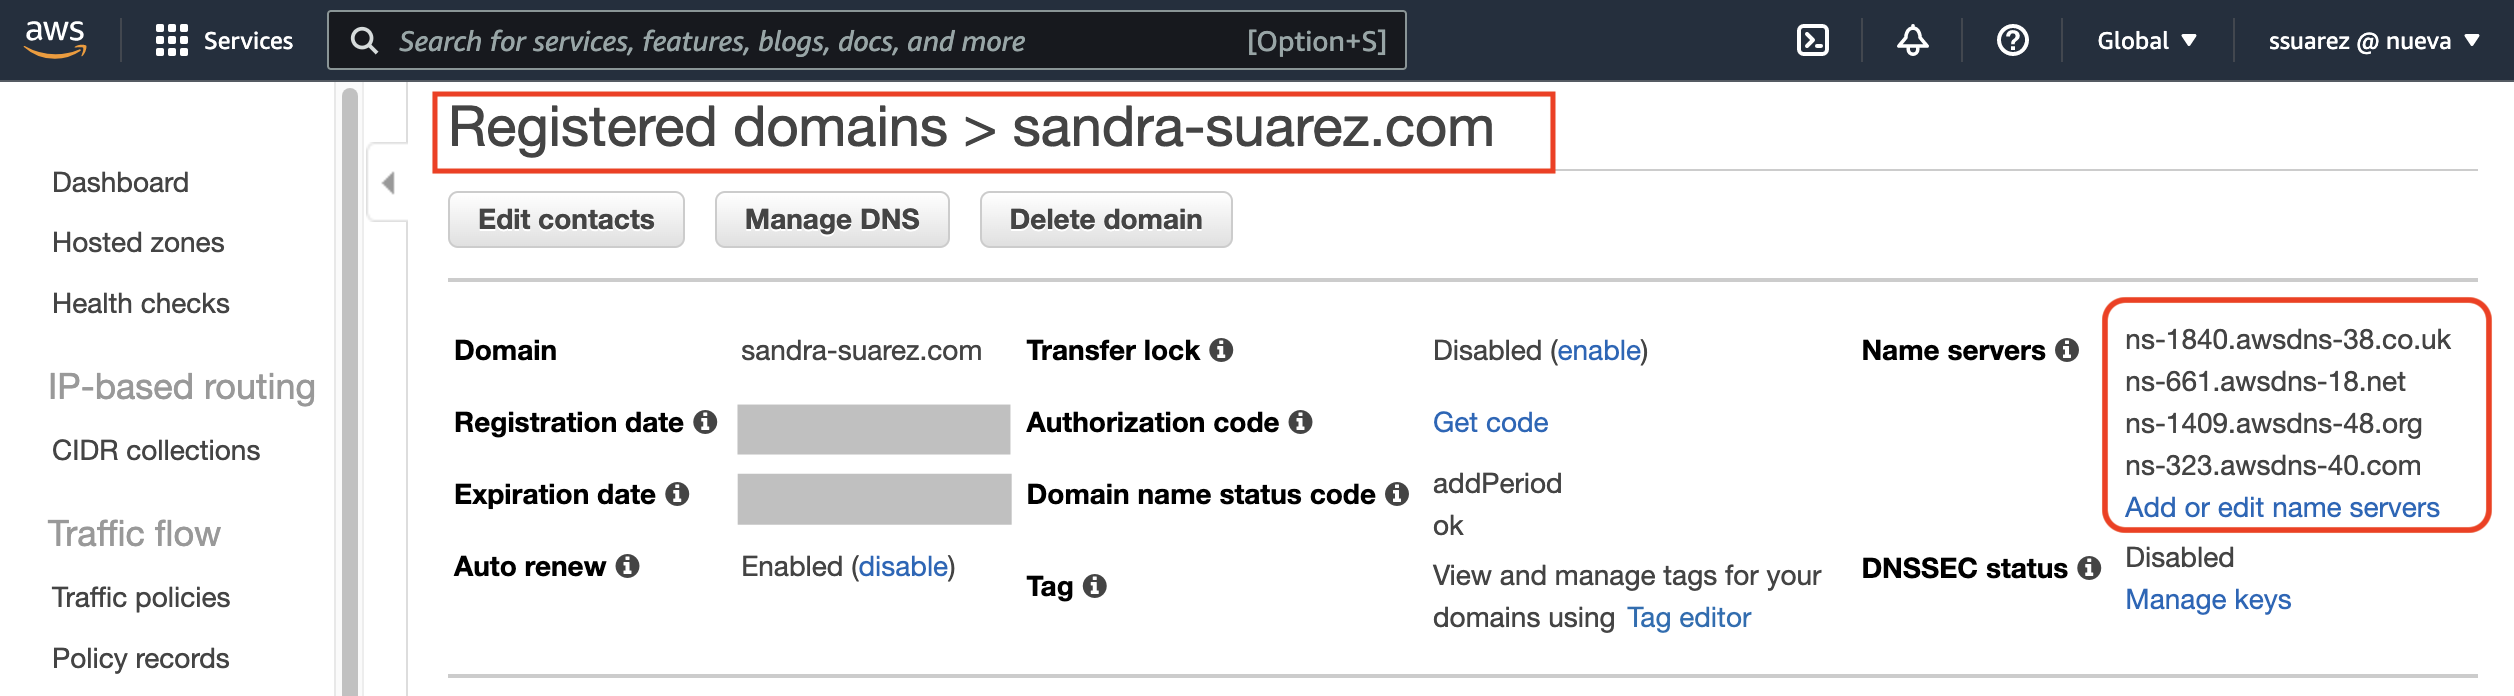
c. After the change, you can verify your DNS propagation here. For me, I saw it start to propagate within minutes but it took a couple of hours for it to propagate everywhere.
2. Root Domains Require An Extra DNS Entry
When setting up your Hashnode blog, you will need to decide whether to point it to your root domain or a sub-domain. In my case:
- example of a root domain:
sandra-suarez.com - example of a sub-domain:
blog.sandra-suarez.com
My personal site is specifically for blogging so I went the root domain route to keep things simple.
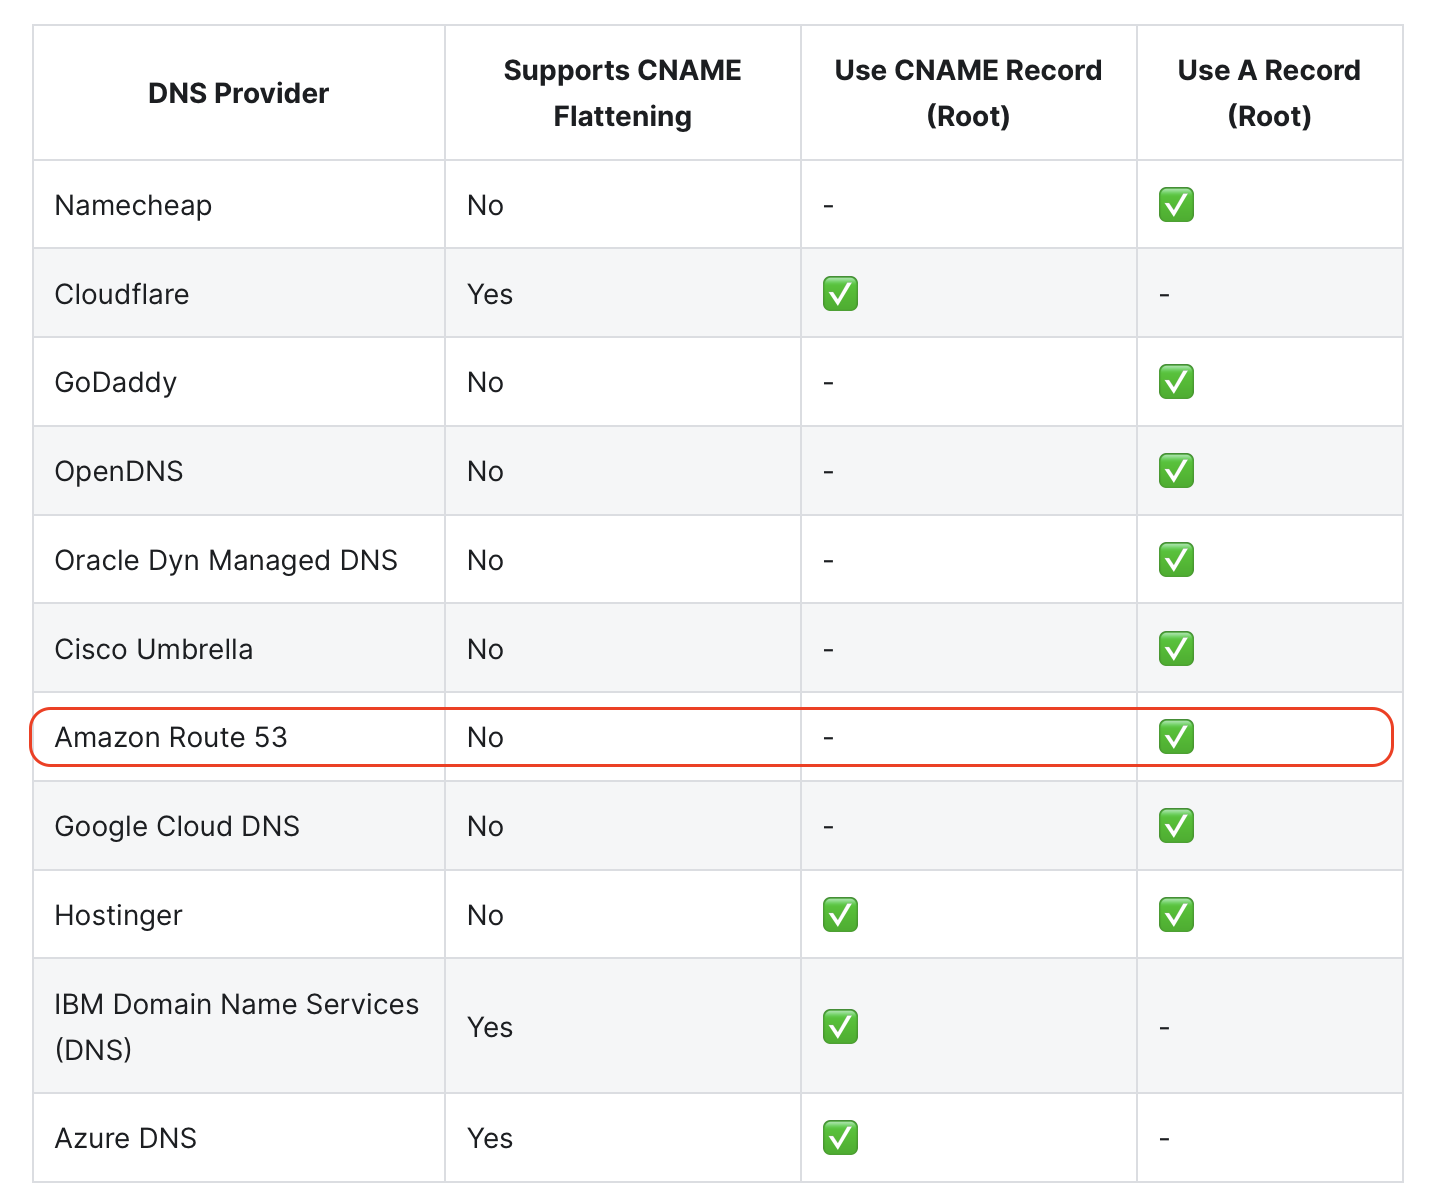
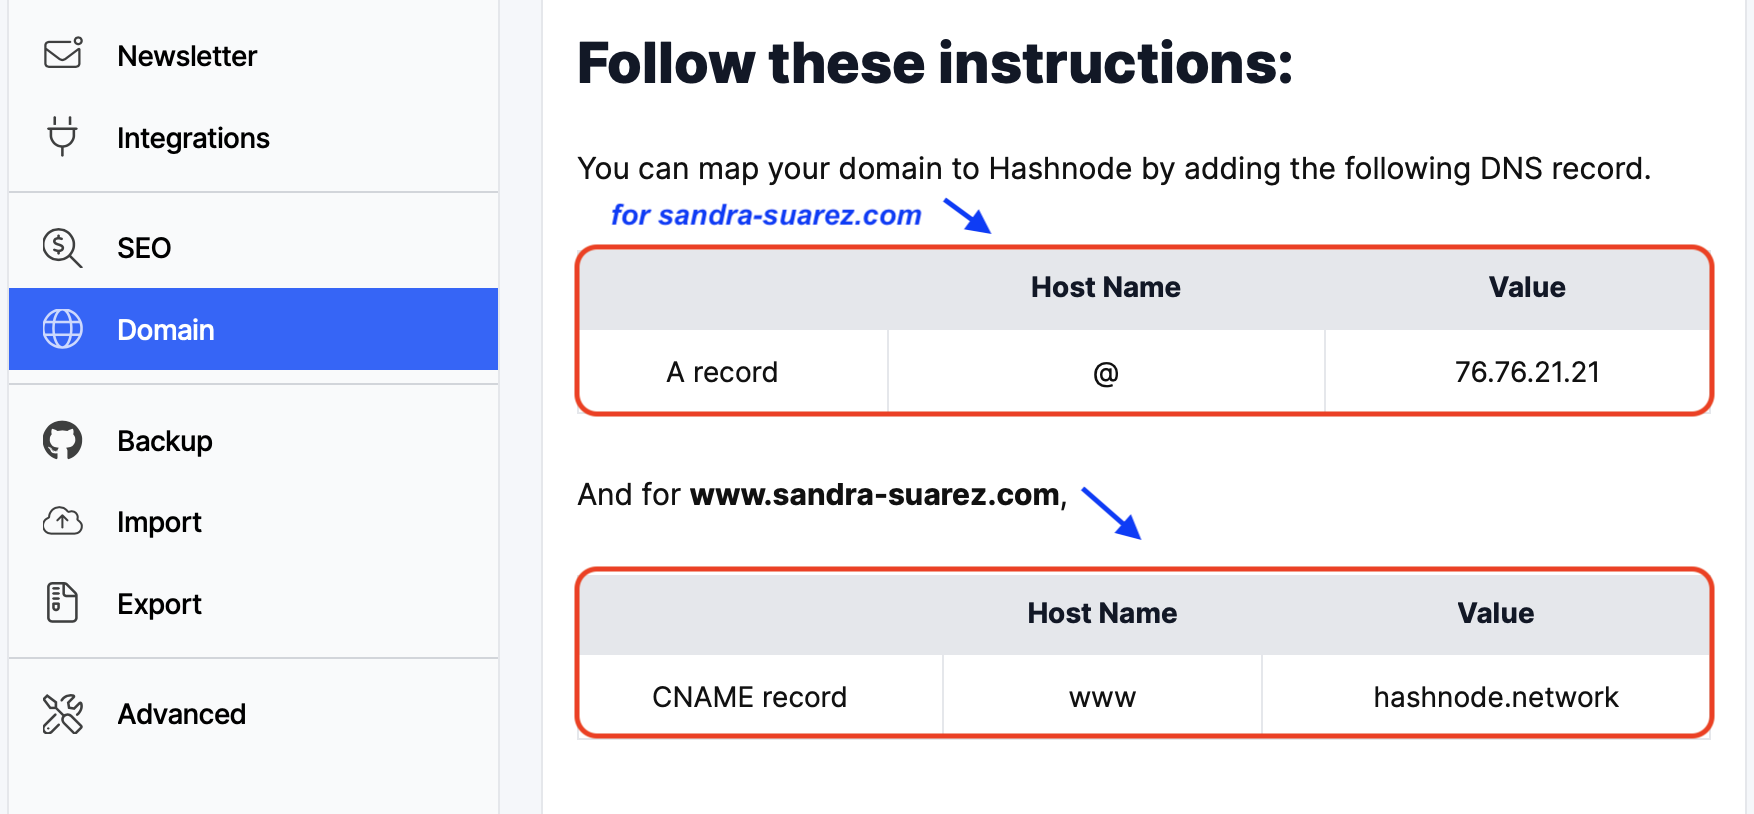
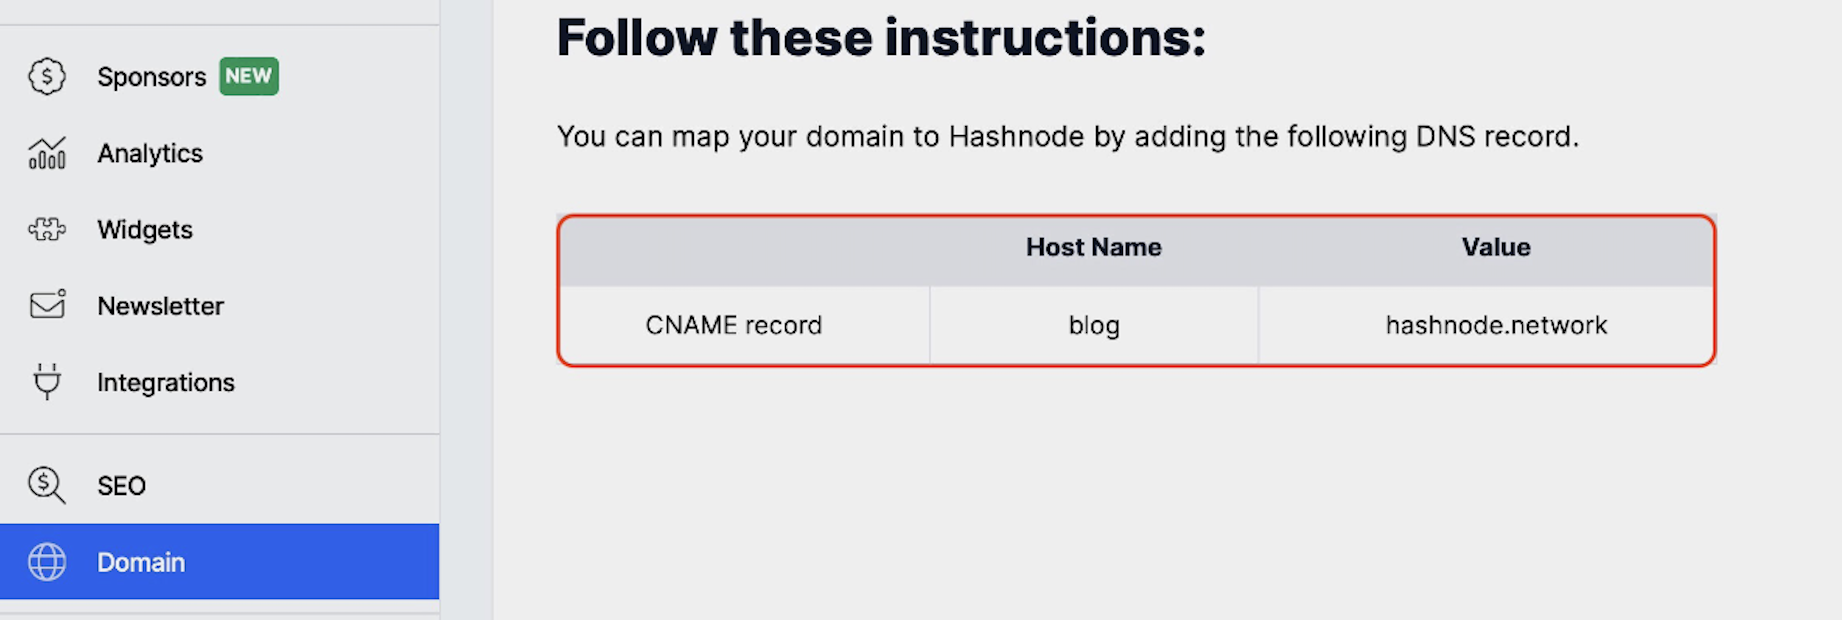
Because Route 53 does not support CNAME flattening, setups for a root domain will require an extra DNS entry compared to a sub-domain setup.
Hashnode provides a a handy table (see below) indicating whether your DNS provider supports CNAME flattening. If so, like in the case of Cloudflare, you only need to create a "CNAME" DNS entry. Route 53, on the other hand, does not support CNAME flattening, so two DNS entries are required: a "CNAME" and an "A" entry.
In the two screenshots below, notice how a root domain setup requires two DNS entries, "CNAME" and an "A" entry while a sub-domain requires only one.
Root Domain Setup Instructions from Hashnode
Sub-Domain Setup Instructions from Hashnode
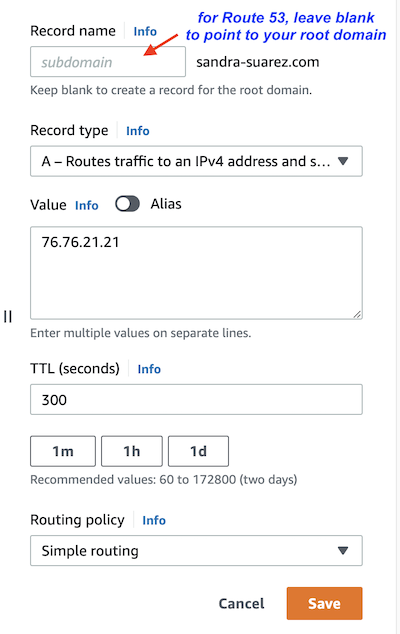
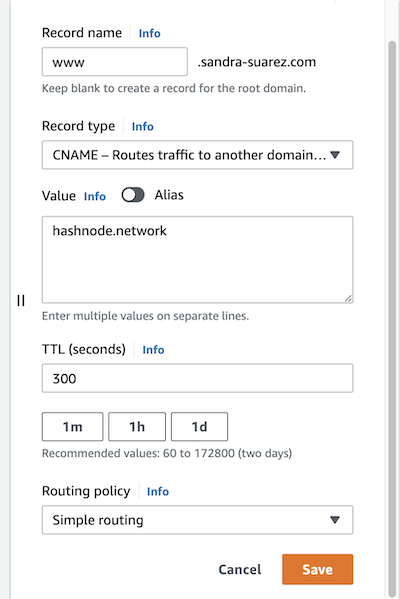
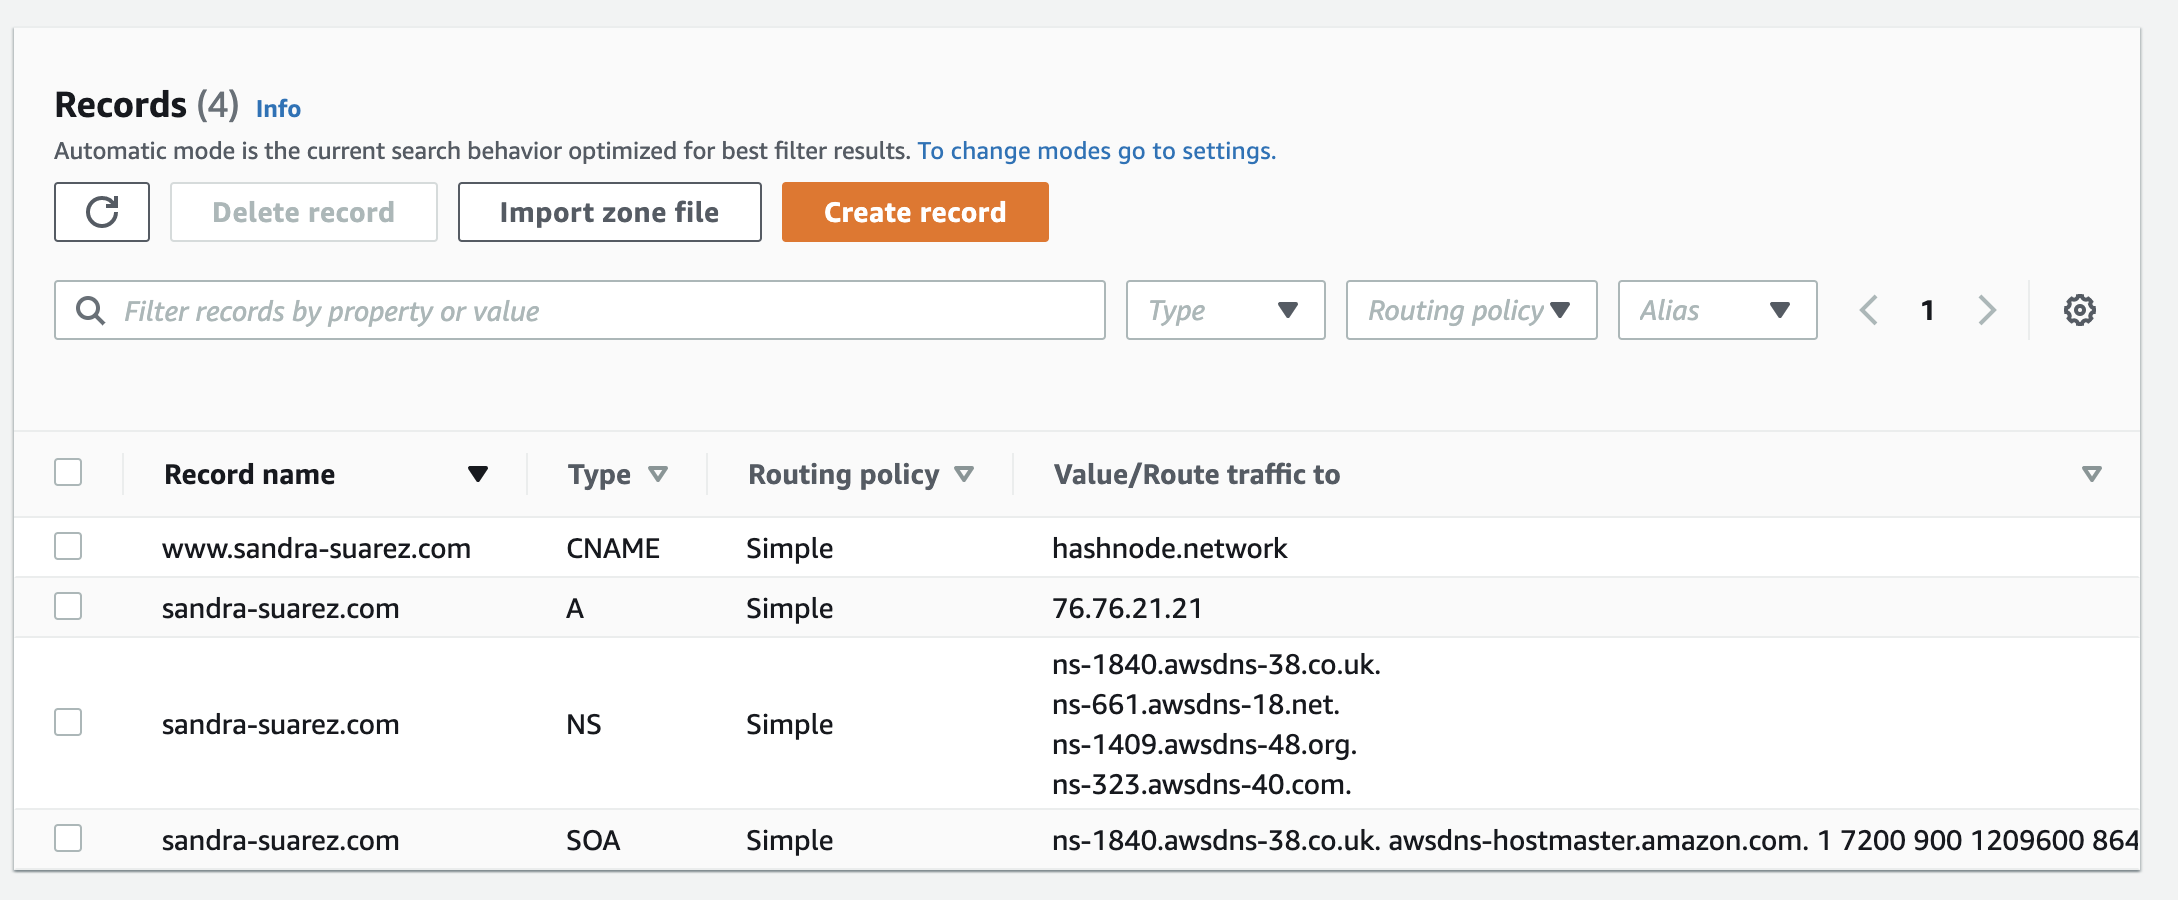
And so for the case of a root domain setup, here is what these settings will look like in Route 53:
DNS record setup for sandra-suarez.com
 DNS record setup for
 www.sandra-suarez.com
Here is the final setup of my DNS entries in Route 53:
3. Discrepancy between Hashnode's and Route 53's Instructions
You may have caught a discrepancy between Hashnode's instructions and Route 53's when it came to setting up the DNS entry for your root domain. See screenshot below.
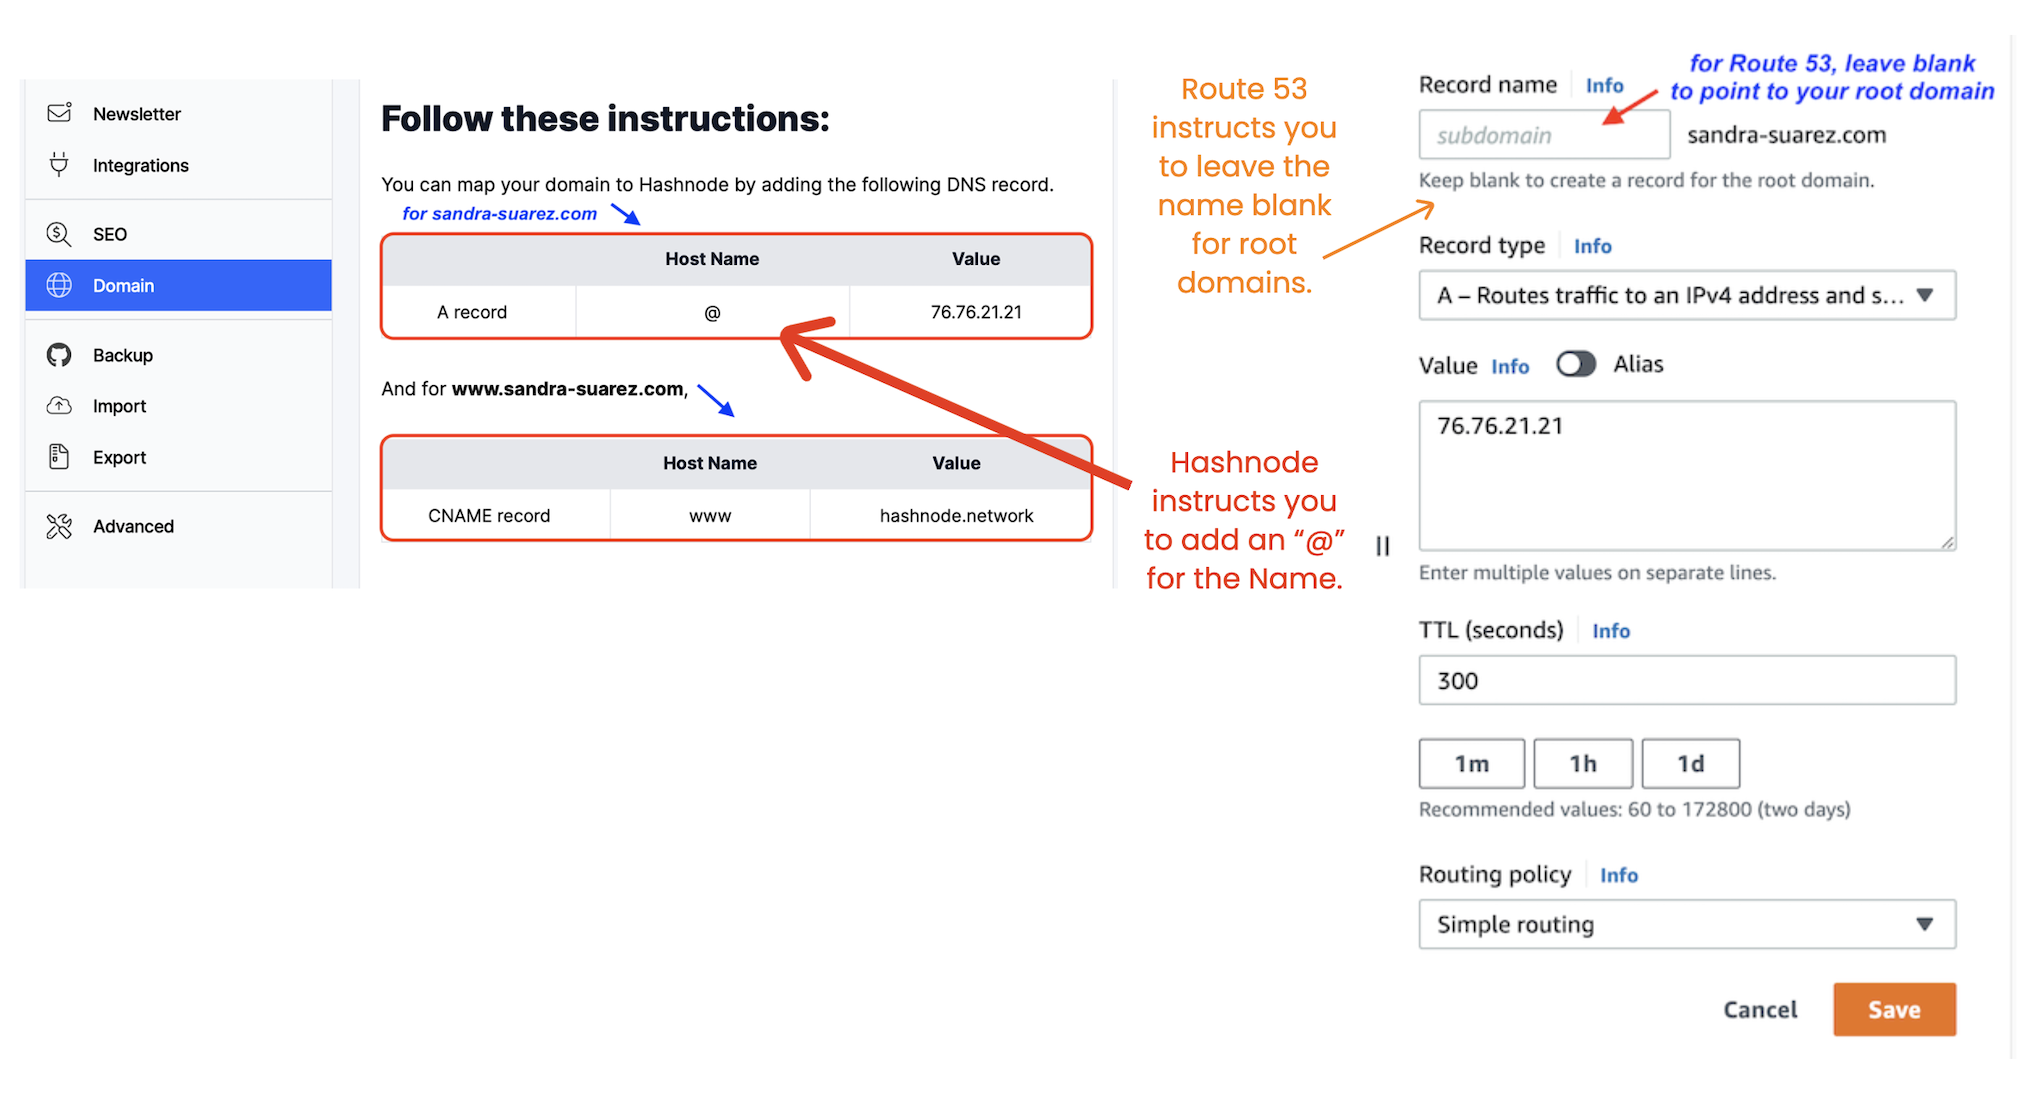
As of today, July 3, 2022, in order for my blog to work, I need a DNS entry saved with an empty record name, as shown by Route 53's pic on the right. Creating a DNS entry that mimics Hashnode's setup on the left doesn't impact my setups, as long as I have an entry as suggested by Route 53. I verified this by first creating my DNS entries as described by Hashnode. When that didn't work, I added a DNS entry as described by Route 53. My blog now worked. I then removed the DNS entry with the '@' and found that my blog still worked. Finally, I re-ran these test scenarios to ensure my results were consistent.
Recap Of Considerations Above
To quickly summarize:
- Decide whether you want your root domain or a sub-domain to point to your Hashnode blog.
- In Hashnode - Follow Hashnode's instructions for custom domains, taking special note of setups for either a root domain or sub-domain mapping.
- In Route 53 - Ensure the name servers between your registered domain and your hosted zone match.
- For root domain mappings, perform these additional steps:
- In Route 53 - Ensure you setup two DNS records, one for your root domain and a second one for "www" to redirect to your root domain. You only need one DNS record if you are pointing to a sub-domain.
- In Route 53 - Ensure the record name of the DNS entry for your root domain is empty.
Happy Blogging
My hope is that this quick blog saves you time.
Like or comment below if this helps with the setup of your new blog. I look forward to viewing and following your blog.